**Look out for the + Button (at the bottom right of this page) to view more (hidden) parameters**
Part A considerations are "Platform-Generic", meaning that these user-input parameters are 'important' across all Symbols that are to be traded on the AlgoEdge EA
Part B considerations are also 'important', but these will be specific and unique (although common in approach) towards the selected trading Symbol chart upon which the EA is to be attached.
Symbol Unique Parameters are listed in Groups within the Properties input Table of your EA - using AUDCAD as an example, a grouping of Symbol Unique Parameters would look something like this:
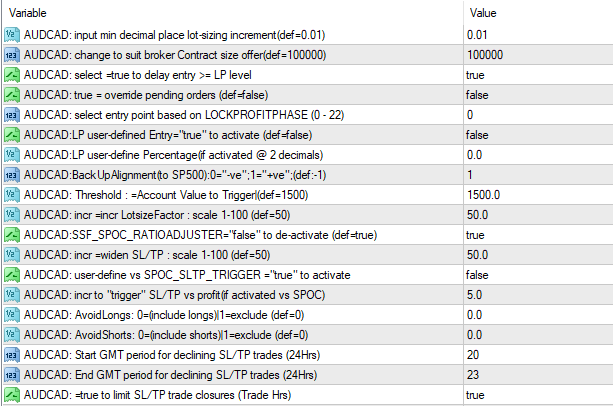 In many ways, the Symbol-Unique groupings can make the properties-input table seem a bit 'cluttered' even 'duanting', which is part of the reason why we have chosen to issue EA's with a grouping of just 14 + 3 (bonus) Symbols, per Group - any more would be impossible to contain inside of a single properties-input table!
At this stage, you should have already worked through the optimisation of the Critical Parameters and also the Important - Platform Generic Parameters and you would have (as we suggested) saved those settings as a generic 'Master Entry' preset file. Now that you are starting with optimising the Important Symbol-Unique parameters, you should expand the saving of your 'Master Entry' file giving each Symbol a unique name by adding a suffix in the file name, eg : MasterEntry_AUDCAD. Next, you should save the file to the appropriate folder, as previously discussed and detailed. As you proceed through the optimisation process, always remember to be sure that you are working on the correct file, by loading it from the properties table and then saving it as you make changes/optimisations.
We are sure that once you get familiar with the setup and especially once you have completed your initial optimisation and have saved a set of 'Master Entry' preset files that cover all of your Symbols, that you will find the user-input table 'easier-and-easier' to interface with as time goes on.
- it does just take a little bit of patience and perseverance to begin with and for that, we applaud you ...
No-one ever said that Trading consistently would be easy! (and if anyone did, don't listen to them - they're lying...)
In many ways, the Symbol-Unique groupings can make the properties-input table seem a bit 'cluttered' even 'duanting', which is part of the reason why we have chosen to issue EA's with a grouping of just 14 + 3 (bonus) Symbols, per Group - any more would be impossible to contain inside of a single properties-input table!
At this stage, you should have already worked through the optimisation of the Critical Parameters and also the Important - Platform Generic Parameters and you would have (as we suggested) saved those settings as a generic 'Master Entry' preset file. Now that you are starting with optimising the Important Symbol-Unique parameters, you should expand the saving of your 'Master Entry' file giving each Symbol a unique name by adding a suffix in the file name, eg : MasterEntry_AUDCAD. Next, you should save the file to the appropriate folder, as previously discussed and detailed. As you proceed through the optimisation process, always remember to be sure that you are working on the correct file, by loading it from the properties table and then saving it as you make changes/optimisations.
We are sure that once you get familiar with the setup and especially once you have completed your initial optimisation and have saved a set of 'Master Entry' preset files that cover all of your Symbols, that you will find the user-input table 'easier-and-easier' to interface with as time goes on.
- it does just take a little bit of patience and perseverance to begin with and for that, we applaud you ...
No-one ever said that Trading consistently would be easy! (and if anyone did, don't listen to them - they're lying...)
The first Important 'symbol-unique' Parameter that you must make a decision on, is actually a pair of parameters that refer to Broker minimum Lotsizing and standard Contract sizing and looks like this :
 You will find this parameter pair is repeated for each symbol throughout the properties table list and is the first listing/s as each Symbol grouping starts - simply look for the [I] Prefix under each section that shows all the relevant parameters for that symbol and then the associated text:
min decimal place lot-sizing increment(def=0.01)
Broker Contract size offer(def=100000)
(take note of the icon colour - it can help you find the parameter quicker)
- You need to only update the sectional parameter that refers to the specific Symbol upon which Chart you are installing the EA; i.e. You need to update this parameter with your preference only ONCE per Symbol, and then save your preferred/optimised setting to the respective 'Master Entry' preset file that is named for that Symbol.
This is an Important selection because your selection here ensures that your Broker-specific minimum Lot-sizing and standard contract sizing, both as related to the specific Symbol in question, are correctly detailed - these are very important parameters that are used in the algorithmic computations and have a bearing on a number of factors, most notably Risk management of your portfolio, so it is important that this detail is correct. If you are using one of our Trusted Brokers, then it is likely that the default values provided are correct, but please do check carefully for each Symbol as significant variations can occur across Symbols and between Brokers - these are most certainly not static parameters and Brokers will change them at will!
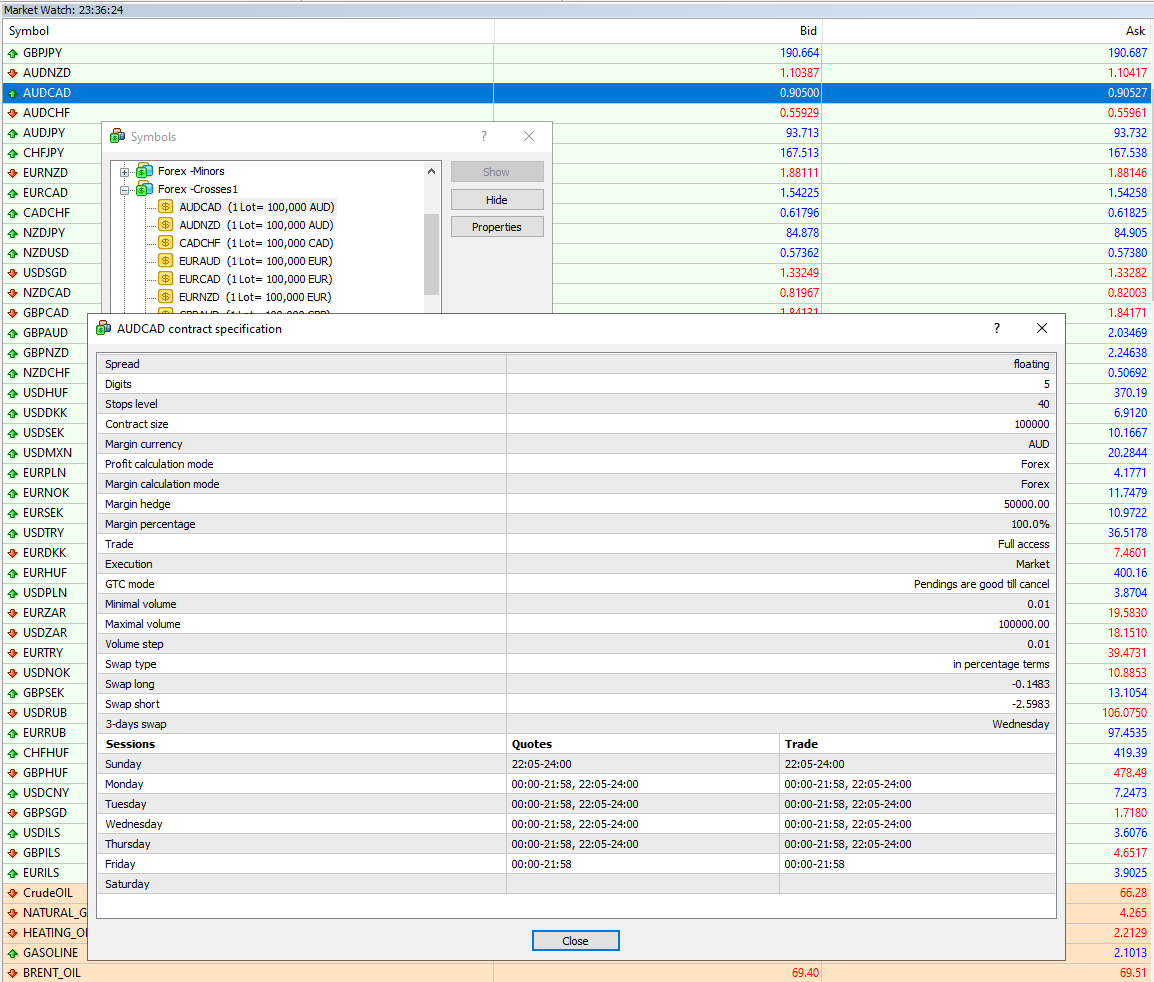
You can usually verify both of these parameters directly from within your MT4 Platform - see example below:
You will find this parameter pair is repeated for each symbol throughout the properties table list and is the first listing/s as each Symbol grouping starts - simply look for the [I] Prefix under each section that shows all the relevant parameters for that symbol and then the associated text:
min decimal place lot-sizing increment(def=0.01)
Broker Contract size offer(def=100000)
(take note of the icon colour - it can help you find the parameter quicker)
- You need to only update the sectional parameter that refers to the specific Symbol upon which Chart you are installing the EA; i.e. You need to update this parameter with your preference only ONCE per Symbol, and then save your preferred/optimised setting to the respective 'Master Entry' preset file that is named for that Symbol.
This is an Important selection because your selection here ensures that your Broker-specific minimum Lot-sizing and standard contract sizing, both as related to the specific Symbol in question, are correctly detailed - these are very important parameters that are used in the algorithmic computations and have a bearing on a number of factors, most notably Risk management of your portfolio, so it is important that this detail is correct. If you are using one of our Trusted Brokers, then it is likely that the default values provided are correct, but please do check carefully for each Symbol as significant variations can occur across Symbols and between Brokers - these are most certainly not static parameters and Brokers will change them at will!
You can usually verify both of these parameters directly from within your MT4 Platform - see example below:
 Simply verify these Lot-sizing and Contract sizing settings as they apply to the specific Symbol upon which chart you have loaded the EA and then update the saved 'Master Entry' preset file for that Symbol.
Simply verify these Lot-sizing and Contract sizing settings as they apply to the specific Symbol upon which chart you have loaded the EA and then update the saved 'Master Entry' preset file for that Symbol.
The second Important 'symbol-unique' Parameter that you must make a decision on, is actually a group of parameters that relate to LockProfit settings and looks like this :
 You will find this parameter grouping is repeated for each symbol throughout the properties table list and is amongst the first listing/s as each Symbol grouping starts - simply look for the [I] Prefix under each section that shows all the relevant parameters for that symbol and then the associated text:
Delay entry >= LP level (def=true)
select entry pt based on LOCKPROFITPHASE(0-22)
Override to allow user-defined LP Entry
LP user-define Percentage(if activated)
(take note of the icon colour - it can help you find the parameter quicker)
- You need to only update the sectional parameter that refers to the specific Symbol upon which Chart you are installing the EA; i.e. You need to update this parameter with your preference only ONCE per Symbol, and then save your preferred/optimised setting to the respective 'Master Entry' preset file that is named for that Symbol.
This is an Important selection because your selection provides the AlgoEdge system with guidance on how you would like to activate and manage the LockProfit levels on your portfolio - LockProfit levels in this context refer to the engaged Level at which you would like the AlgoEdge system to first allow consideration of the Symbol concerned for technical-based order or trade entry.
Let's more fully explain each of these parameters and how you may optimise them to best suit your own unique trading style and preferences:
Delay entry >= LP level (def=true):
The default setting here is 'true' which basically confirms the activation of this feature - if you would prefer to not use this feature and rather simply allow all Symbols to be considered for immediate entry, without paying attention at all to Lock Profit level engaged, then you may change this setting to 'false'.
NOTE: Where the selected LockProfit level is = 0, then this implies 'no delay on consideration of Symbol order/trade entry', regardless of the true/false selection that is made here.
select entry pt based on LOCKPROFITPHASE(0-22):
The default setting here is '0' which basically implies that the Symbol concerned may be considered for order or trade entry at any stage, regardless of whether or not the portfolio has moved into profit and secured a LockProfit.
You may notice that for some Symbols, the LockProfit default is set at a number that is >0 - this is because these Symbols are (in our opinion) simply too costly, even at minimum lotsizing level to be reasonably considered (without your careful consideration) for entry prior to at least securing your portfolio to be in a profitable situation, with LockProfit engaged to 'protect' your portfolio against excessive loss. You may of course change this to suit your own preference, especially where you may have a fairly large account and therefore the ability to further reduce the exposed lotsizing and hence contain risk in this manner.
As noted in the text field, you may select any integer value in the range 0 - 22. LockProfit phasing is Intellectual Property (IP) of 99 WhiteSwans, but the image below does give you at least an indication of how you may interpret the number here when considering the most appropriate setting, by Symbol :
You will find this parameter grouping is repeated for each symbol throughout the properties table list and is amongst the first listing/s as each Symbol grouping starts - simply look for the [I] Prefix under each section that shows all the relevant parameters for that symbol and then the associated text:
Delay entry >= LP level (def=true)
select entry pt based on LOCKPROFITPHASE(0-22)
Override to allow user-defined LP Entry
LP user-define Percentage(if activated)
(take note of the icon colour - it can help you find the parameter quicker)
- You need to only update the sectional parameter that refers to the specific Symbol upon which Chart you are installing the EA; i.e. You need to update this parameter with your preference only ONCE per Symbol, and then save your preferred/optimised setting to the respective 'Master Entry' preset file that is named for that Symbol.
This is an Important selection because your selection provides the AlgoEdge system with guidance on how you would like to activate and manage the LockProfit levels on your portfolio - LockProfit levels in this context refer to the engaged Level at which you would like the AlgoEdge system to first allow consideration of the Symbol concerned for technical-based order or trade entry.
Let's more fully explain each of these parameters and how you may optimise them to best suit your own unique trading style and preferences:
Delay entry >= LP level (def=true):
The default setting here is 'true' which basically confirms the activation of this feature - if you would prefer to not use this feature and rather simply allow all Symbols to be considered for immediate entry, without paying attention at all to Lock Profit level engaged, then you may change this setting to 'false'.
NOTE: Where the selected LockProfit level is = 0, then this implies 'no delay on consideration of Symbol order/trade entry', regardless of the true/false selection that is made here.
select entry pt based on LOCKPROFITPHASE(0-22):
The default setting here is '0' which basically implies that the Symbol concerned may be considered for order or trade entry at any stage, regardless of whether or not the portfolio has moved into profit and secured a LockProfit.
You may notice that for some Symbols, the LockProfit default is set at a number that is >0 - this is because these Symbols are (in our opinion) simply too costly, even at minimum lotsizing level to be reasonably considered (without your careful consideration) for entry prior to at least securing your portfolio to be in a profitable situation, with LockProfit engaged to 'protect' your portfolio against excessive loss. You may of course change this to suit your own preference, especially where you may have a fairly large account and therefore the ability to further reduce the exposed lotsizing and hence contain risk in this manner.
As noted in the text field, you may select any integer value in the range 0 - 22. LockProfit phasing is Intellectual Property (IP) of 99 WhiteSwans, but the image below does give you at least an indication of how you may interpret the number here when considering the most appropriate setting, by Symbol :
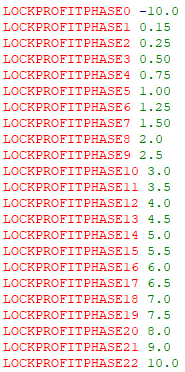 LockProfitPhase0 indicates a value of -10.0 which you may simply interpret as 0 (unrestricted entry);
All other indicated LockProfit phases show values that relate to the secured/locked % profit level at which the entire portfolio would be expected to undergo a 'CloseAll' event.
Override to allow user-defined LP Entry:
The default setting here is 'false'. This is a fairly self-explanatory parameter in that a selection of 'true' here would override the above two LockProfit parameters and rather put full control in your hands as the Trader. - this parameter works in combination with the parameter below where the % profit metric is provided.
LP user-define Percentage(if activated):
The default setting here is '0'. This parameter works in combination with the 'override' parameter listed above - if you have activated the override, then this parameter becomes active also, allowing you to enter a percentage profit value at which you are comfortable to allow the AlgoEdge system to consider the Symbol for order or trade entry.
With these last two parameters, we have provided full control on Symbol entry timing consideration in your hands as the Trader.
Simply verify these guidance parameter settings for Order/Trade entry vs Lock Profit as they apply to the specific Symbol upon which chart you have loaded the EA and then update the saved 'Master Entry' preset file for that Symbol.
LockProfitPhase0 indicates a value of -10.0 which you may simply interpret as 0 (unrestricted entry);
All other indicated LockProfit phases show values that relate to the secured/locked % profit level at which the entire portfolio would be expected to undergo a 'CloseAll' event.
Override to allow user-defined LP Entry:
The default setting here is 'false'. This is a fairly self-explanatory parameter in that a selection of 'true' here would override the above two LockProfit parameters and rather put full control in your hands as the Trader. - this parameter works in combination with the parameter below where the % profit metric is provided.
LP user-define Percentage(if activated):
The default setting here is '0'. This parameter works in combination with the 'override' parameter listed above - if you have activated the override, then this parameter becomes active also, allowing you to enter a percentage profit value at which you are comfortable to allow the AlgoEdge system to consider the Symbol for order or trade entry.
With these last two parameters, we have provided full control on Symbol entry timing consideration in your hands as the Trader.
Simply verify these guidance parameter settings for Order/Trade entry vs Lock Profit as they apply to the specific Symbol upon which chart you have loaded the EA and then update the saved 'Master Entry' preset file for that Symbol.
You will find this parameter grouping is repeated for each symbol throughout the properties table list and is amongst the first listing/s as each Symbol grouping starts - simply look for the [I] Prefix under each section that shows all the relevant parameters for that symbol and then the associated text:
Delay entry >= LP level (def=true)
select entry pt based on LOCKPROFITPHASE(0-22)
Override to allow user-defined LP Entry
LP user-define Percentage(if activated)
(take note of the icon colour - it can help you find the parameter quicker)
- You need to only update the sectional parameter that refers to the specific Symbol upon which Chart you are installing the EA; i.e. You need to update this parameter with your preference only ONCE per Symbol, and then save your preferred/optimised setting to the respective 'Master Entry' preset file that is named for that Symbol.
This is an Important selection because your selection provides the AlgoEdge system with guidance on how you would like to activate and manage the LockProfit levels on your portfolio - LockProfit levels in this context refer to the engaged Level at which you would like the AlgoEdge system to first allow consideration of the Symbol concerned for technical-based order or trade entry.
Let's more fully explain each of these parameters and how you may optimise them to best suit your own unique trading style and preferences:
Delay entry >= LP level (def=true):
The default setting here is 'true' which basically confirms the activation of this feature - if you would prefer to not use this feature and rather simply allow all Symbols to be considered for immediate entry, without paying attention at all to Lock Profit level engaged, then you may change this setting to 'false'.
NOTE: Where the selected LockProfit level is = 0, then this implies 'no delay on consideration of Symbol order/trade entry', regardless of the true/false selection that is made here.
select entry pt based on LOCKPROFITPHASE(0-22):
The default setting here is '0' which basically implies that the Symbol concerned may be considered for order or trade entry at any stage, regardless of whether or not the portfolio has moved into profit and secured a LockProfit.
You may notice that for some Symbols, the LockProfit default is set at a number that is >0 - this is because these Symbols are (in our opinion) simply too costly, even at minimum lotsizing level to be reasonably considered (without your careful consideration) for entry prior to at least securing your portfolio to be in a profitable situation, with LockProfit engaged to 'protect' your portfolio against excessive loss. You may of course change this to suit your own preference, especially where you may have a fairly large account and therefore the ability to further reduce the exposed lotsizing and hence contain risk in this manner.
As noted in the text field, you may select any integer value in the range 0 - 22. LockProfit phasing is Intellectual Property (IP) of 99 WhiteSwans, but the image below does give you at least an indication of how you may interpret the number here when considering the most appropriate setting, by Symbol :
LockProfitPhase0 indicates a value of -10.0 which you may simply interpret as 0 (unrestricted entry);
All other indicated LockProfit phases show values that relate to the secured/locked % profit level at which the entire portfolio would be expected to undergo a 'CloseAll' event.
Override to allow user-defined LP Entry:
The default setting here is 'false'. This is a fairly self-explanatory parameter in that a selection of 'true' here would override the above two LockProfit parameters and rather put full control in your hands as the Trader. - this parameter works in combination with the parameter below where the % profit metric is provided.
LP user-define Percentage(if activated):
The default setting here is '0'. This parameter works in combination with the 'override' parameter listed above - if you have activated the override, then this parameter becomes active also, allowing you to enter a percentage profit value at which you are comfortable to allow the AlgoEdge system to consider the Symbol for order or trade entry.
With these last two parameters, we have provided full control on Symbol entry timing consideration in your hands as the Trader.
Simply verify these guidance parameter settings for Order/Trade entry vs Lock Profit as they apply to the specific Symbol upon which chart you have loaded the EA and then update the saved 'Master Entry' preset file for that Symbol.
The third Important 'symbol-unique' Parameter that you must make a decision on, is a parameter that relates to Account Threshold settings and looks like this :
 You will find this parameter is repeated for each symbol throughout the properties table list and is a listing that is somewhere near midway through each Symbol grouping - simply look for the [I] Prefix under each section that shows all the relevant parameters for that symbol and then the associated text:
Threshold: =Account Value to Trigger|(def=5000)
(take note of the icon colour - it can help you find the parameter quicker)
- You need to only update the sectional parameter that refers to the specific Symbol upon which Chart you are installing the EA; i.e. You need to update this parameter with your preference only ONCE per Symbol, and then save your preferred/optimised setting to the respective 'Master Entry' preset file that is named for that Symbol.
This is an Important selection because your selection provides the AlgoEdge system with guidance on what the Account Threshold should be before the specific Symbol may be considered for order or trade entry.
The default setting here will differ by Symbol and is simply provided as a 'starting guideline' to the User in relation to each Symbol. Each Trader has different experiences and risk considerations and as such, you should consider these threshold levels and adapt them to suit your own needs - always consider this in light of the reality of your own Account size; the lotsizing being placed for the Symbol in question; the Stop-Loss in place; the overall %Risk that the order contributes to your portfolio.
Simply adapt these guidance parameter settings for Account Threshold entry as they apply to the specific Symbol upon which chart you have loaded the EA and then update the saved 'Master Entry' preset file for that Symbol.
You will find this parameter is repeated for each symbol throughout the properties table list and is a listing that is somewhere near midway through each Symbol grouping - simply look for the [I] Prefix under each section that shows all the relevant parameters for that symbol and then the associated text:
Threshold: =Account Value to Trigger|(def=5000)
(take note of the icon colour - it can help you find the parameter quicker)
- You need to only update the sectional parameter that refers to the specific Symbol upon which Chart you are installing the EA; i.e. You need to update this parameter with your preference only ONCE per Symbol, and then save your preferred/optimised setting to the respective 'Master Entry' preset file that is named for that Symbol.
This is an Important selection because your selection provides the AlgoEdge system with guidance on what the Account Threshold should be before the specific Symbol may be considered for order or trade entry.
The default setting here will differ by Symbol and is simply provided as a 'starting guideline' to the User in relation to each Symbol. Each Trader has different experiences and risk considerations and as such, you should consider these threshold levels and adapt them to suit your own needs - always consider this in light of the reality of your own Account size; the lotsizing being placed for the Symbol in question; the Stop-Loss in place; the overall %Risk that the order contributes to your portfolio.
Simply adapt these guidance parameter settings for Account Threshold entry as they apply to the specific Symbol upon which chart you have loaded the EA and then update the saved 'Master Entry' preset file for that Symbol.
The fourth Important 'symbol-unique' Parameter that you must make a decision on, is a parameter that relates to a your preferred symbol-specific Lotsizing settings and looks like this :
 You will find this parameter is repeated for each symbol throughout the properties table list and is a listing that is somewhere near midway through each Symbol grouping - simply look for the [I] Prefix under each section that shows all the relevant parameters for that symbol and then the associated text:
incr LotsizeFactor : scale 1-100 (def=50)
(take note of the icon colour - it can help you find the parameter quicker)
- You need to only update the sectional parameter that refers to the specific Symbol upon which Chart you are installing the EA; i.e. You need to update this parameter with your preference only ONCE per Symbol, and then save your preferred/optimised setting to the respective 'Master Entry' preset file that is named for that Symbol.
This is an Important selection because your selection provides the AlgoEdge system with guidance on the Lotsizing on the specific Symbol concerned. This is Intellectual Property (IP) to 99 White Swans that we are very proud of as it gives you (the Trader) another powerful tool to manage Risk and potentially maximise your Profits - in this case, directed at individual Symbols and their associated Lotsizing for order and trade entry.
We have managed to devise a system that 'hides' extremely complex algorithmn computations and presents them to you instead as a very simple default value in the range 1-100:
Here is an explanation of how you may now interact with and optimise this value to suit your own trading preferences:
The default setting here is '50' - the value of '50' has no specific merit, but is simply provided as a reference tool against which you can optimise the setting to impact the Lotsizing value : '50' is actually a 'masked' value that sits in front of a hugely diversified metric that is associated with each Symbol and is representative of a meaningful 'starting point' for lotsizing consideration for that symbol; you can think of this as a simple factor that is uniformly devised as a kind of 'midpoint' lotsizing value for that specific symbol, but you can easily ratio the lotsizing UP/DOWN in a range 1-100. Each Trader has different experiences and risk considerations and as such, you should consider the lotsizing value here in your own context and adapt the value to suit your own needs - always consider this in light of the reality of your own Account size; the lotsizing being placed for the Symbol in question; the Stop-Loss in place; the overall %Risk that the order contributes to your portfolio.
Simply adapt these guidance parameter settings for each Symbol lotsizing entry as they apply to the specific Symbol upon which chart you have loaded the EA and then update the saved 'Master Entry' preset file for that Symbol.
NOTE: This is NOT the only mechansim by which you may adapt and influence Lotsizing - we will be explaining other control parameters that you have also, elsewhere in this User-Manual.
You will find this parameter is repeated for each symbol throughout the properties table list and is a listing that is somewhere near midway through each Symbol grouping - simply look for the [I] Prefix under each section that shows all the relevant parameters for that symbol and then the associated text:
incr LotsizeFactor : scale 1-100 (def=50)
(take note of the icon colour - it can help you find the parameter quicker)
- You need to only update the sectional parameter that refers to the specific Symbol upon which Chart you are installing the EA; i.e. You need to update this parameter with your preference only ONCE per Symbol, and then save your preferred/optimised setting to the respective 'Master Entry' preset file that is named for that Symbol.
This is an Important selection because your selection provides the AlgoEdge system with guidance on the Lotsizing on the specific Symbol concerned. This is Intellectual Property (IP) to 99 White Swans that we are very proud of as it gives you (the Trader) another powerful tool to manage Risk and potentially maximise your Profits - in this case, directed at individual Symbols and their associated Lotsizing for order and trade entry.
We have managed to devise a system that 'hides' extremely complex algorithmn computations and presents them to you instead as a very simple default value in the range 1-100:
Here is an explanation of how you may now interact with and optimise this value to suit your own trading preferences:
The default setting here is '50' - the value of '50' has no specific merit, but is simply provided as a reference tool against which you can optimise the setting to impact the Lotsizing value : '50' is actually a 'masked' value that sits in front of a hugely diversified metric that is associated with each Symbol and is representative of a meaningful 'starting point' for lotsizing consideration for that symbol; you can think of this as a simple factor that is uniformly devised as a kind of 'midpoint' lotsizing value for that specific symbol, but you can easily ratio the lotsizing UP/DOWN in a range 1-100. Each Trader has different experiences and risk considerations and as such, you should consider the lotsizing value here in your own context and adapt the value to suit your own needs - always consider this in light of the reality of your own Account size; the lotsizing being placed for the Symbol in question; the Stop-Loss in place; the overall %Risk that the order contributes to your portfolio.
Simply adapt these guidance parameter settings for each Symbol lotsizing entry as they apply to the specific Symbol upon which chart you have loaded the EA and then update the saved 'Master Entry' preset file for that Symbol.
NOTE: This is NOT the only mechansim by which you may adapt and influence Lotsizing - we will be explaining other control parameters that you have also, elsewhere in this User-Manual.
The fifth Important 'symbol-specific' Parameter that you must make a decision on, is actually a group of 4 parameters (2 related pairs) that target the optimisation of Stop Loss and Take Profit (SL/TP) levels and looks like this :
 You will find these parameters 3/4 of the way down the properties table list - simply scroll down and look for the [I] Prefix and then the associated text:
SSF_SPOC_RATIOADJUSTER =false to use SYMBOL_SSF
incr =widen SL/TP : scale 1-100 (def=50)
SYMBOL vs SPOC_SLTP_TRIGGER =true to activate
incr to 'trigger' early v profit(SYMvsSPOC active)
(take note of the icon colour - it can help you find the parameter quicker)
This is an important selection because your selection here will provides clarity to the AlgoEdge EA on your preference for 'platform-generic' vs 'symbol-specific' settings for SL/TP levels and further triggering when you would like to activate trailing. This is Intellectual Property (IP) to 99 White Swans that we are very proud of as it gives you (the Trader) another powerful tool to manage Risk and potentially maximise your Profits - in this case, directed at individual* Symbols and their associated SL/TP activation, whilst at the same time 'respecting' separate controls (covered elsewhere in this User-Manual) that target the entire active portfolio.
- it is necessary to review the similar 'platform-generic' parameter application controls (follow link)
*Note: As much as the SL/TP focus here is on 'individual' Symbols, the design of the system is also for Single Point Of Control (SPOC), meaning that it is OK to use one value right across all Symbols, but the opportunity is still there to be individualistic in application to individual Symbols, where that is the Trader's desire.
You simply won't find anything elsewhere on the market that provides you with this level of control and interaction, as provided by the AlgoEdge trading system and most certainly nothing that can handle as many diverse Symbols as our AlgoEdge system does, always in an entirely synchronised manner!
Here's how this 'symbol-specific' SL/TP system works:
Before explaining the default 'symbol-specific' SL/TP settings and how you may then choose to optimise them, we need you to understand that we start the consideration of these 'symbol-specific' settings on the premise that what you will have already entered under the 'platform-generic' SL/TP settings are considered to be the elected settings until you select this differently, per the true/false decisions that you will make for the parameters discussed below:
Here is an explanation of how you may now interact with and optimise these 4 values (split consideration within 2 pairs) to suit your own trading preferences:
We have managed to devise a system that 'hides' extremely complex algorithmn computations and presents them to you instead in two related pairs of input parameters : (1) SSF parameters that impact the scale of SL/TP; (2) SL/TP Profit Trigger parameters that impact the timing at which trailing of SL/TP is initiated;
(1)Pair 1 - SSF parameters that impact the scale of SL/TP:
- (1a) SSF_SPOC_RATIOADJUSTER =false to use SYMBOL_SSF:
The default value here is 'true' meaning that the SPOC SL/TP SSF Portfolio Adjuster value settings that were input in the 'platform-generic' section are ACTIVE by default; if you wish instead to be very specific and precise about the SSF value for this specific symbol, and hence the SL/TP that will be applied, then you should select 'false' here. selecting 'false' overrides the 'platform-generic' SPOC_SSF value and instead applies the 'symbol-specific' parameter values that you will enter below:
- (1b) incr =widen SL/TP : scale 1-100 (def=50):
The default setting here is '50' - the value of '50' has no specific merit, but is simply provided as a reference tool against which you can optimise the setting to impact the SL/TP value : '50' is actually a 'masked' value that sits in front of a hugely diversified metric that is associated with each Symbol and is representative of a meaningful 'starting point' for SL/TP consideration for that symbol; you can think of this as a simple factor that is uniformly devised as a kind of 'midpoint' SL/TP value for that specific symbol, but you can easily ratio the SL/TP UP/DOWN in a range 1-100. Each Trader has different experiences and risk considerations and as such, you should consider the SL/TP value here in your own context and adapt the value to suit your own needs - always consider this in light of the reality of your own Account size; the lotsizing being placed for the Symbol in question; the Stop-Loss in place; the overall %Risk that the order contributes to your portfolio.
- if, over time, you find the '50' value to be placing SL/TP levels that exceed your expectation or preference, you can try proportionally reducing this value to better suit your preference; similarly, the reverse approach can be used to increase SL/TP levels.
(2)Pair 2 - SL/TP Profit Trigger parameters that impact the timing at which trailing of SL/TP is initiated:
- (2a) SYMBOL vs SPOC_SLTP_TRIGGER =true to activate:
The default value here is 'false' meaning that the SPOC SL/TP Trigger value settings that were input in the 'platform-generic' section are ACTIVE by default; if you wish instead to be very specific and precise about the SLTP Trigger value for this specific symbol, and hence the Profit level at which SL/TP dynamic activation (SLTP trailing) will be applied, then you should select 'true' here - Selecting 'true' overrides the 'platform-generic' SPOC SL/TP Trigger value and instead applies the 'symbol-specific' parameter values that you will enter below:
- (2b) incr to 'trigger' early v profit(SYMvsSPOC active):
We have set a default value here of 5.0 - the value of '5.0' has no specific merit, but is simply provided as a reference tool against which you can optimise the setting to impact the SL/TP Trigger value : '5.0' is actually a 'masked' value that sits in front of a hugely diversified metric that is associated with each Symbol and is representative of a Profit/Loss value that will trigger the SL/TP into a dynamic action which may be to either trail the stoploss, or in some situations to adapt the TP as a risk mitigation tool to potentially reduce losses in a losing trade situation - if, over time, you find the '5.0' value to be a bit 'loose' on triggering this SL/TP action, you may simply increase the number - so, for example if you were to increase the value of '5.0' by 50% to '7.5', then this would proportionally reduce the Profit/Loss level at which the SL/TP dynamics come into play; similarly, a reduction of the value of '5.0' to a lower number, would have a reverse effect (in proportion).
Always remember that SL/TP settings will also impact %Risk exposure, as detailed elsewhere in this User-Manual.
- if this all sounds a little bit too complex, it is because IT IS complex! But all that you really need to know is that the default value of '5.0' will work for you in most situations, but if you want you can make the SL/TP even more dynamic by slightly increasing the value, or you can 'soften' the SL/TP action by reducing the value somewhat. Also, it is useful to know that this is also not the only way that AlgoEdge Trading system handles stop loss and take profit levels - we also have some other overlying techniques that monitor and track very unique SL/TP approaches to be explained elsewhere in this User-Manual.
Simply input the SL/TP 'Trigger' and 'SSF" values that you feel to be most appropriate to suit your trading style and expectations.
- feel free to 'revisit' and further optimise these input levels as you gain experience with how the AlgoEdge Trading system behaves over time...
The choice is always yours - change the 'symbol-specific' SL/TP settings to suit you!
You will find these parameters 3/4 of the way down the properties table list - simply scroll down and look for the [I] Prefix and then the associated text:
SSF_SPOC_RATIOADJUSTER =false to use SYMBOL_SSF
incr =widen SL/TP : scale 1-100 (def=50)
SYMBOL vs SPOC_SLTP_TRIGGER =true to activate
incr to 'trigger' early v profit(SYMvsSPOC active)
(take note of the icon colour - it can help you find the parameter quicker)
This is an important selection because your selection here will provides clarity to the AlgoEdge EA on your preference for 'platform-generic' vs 'symbol-specific' settings for SL/TP levels and further triggering when you would like to activate trailing. This is Intellectual Property (IP) to 99 White Swans that we are very proud of as it gives you (the Trader) another powerful tool to manage Risk and potentially maximise your Profits - in this case, directed at individual* Symbols and their associated SL/TP activation, whilst at the same time 'respecting' separate controls (covered elsewhere in this User-Manual) that target the entire active portfolio.
- it is necessary to review the similar 'platform-generic' parameter application controls (follow link)
*Note: As much as the SL/TP focus here is on 'individual' Symbols, the design of the system is also for Single Point Of Control (SPOC), meaning that it is OK to use one value right across all Symbols, but the opportunity is still there to be individualistic in application to individual Symbols, where that is the Trader's desire.
You simply won't find anything elsewhere on the market that provides you with this level of control and interaction, as provided by the AlgoEdge trading system and most certainly nothing that can handle as many diverse Symbols as our AlgoEdge system does, always in an entirely synchronised manner!
Here's how this 'symbol-specific' SL/TP system works:
Before explaining the default 'symbol-specific' SL/TP settings and how you may then choose to optimise them, we need you to understand that we start the consideration of these 'symbol-specific' settings on the premise that what you will have already entered under the 'platform-generic' SL/TP settings are considered to be the elected settings until you select this differently, per the true/false decisions that you will make for the parameters discussed below:
Here is an explanation of how you may now interact with and optimise these 4 values (split consideration within 2 pairs) to suit your own trading preferences:
We have managed to devise a system that 'hides' extremely complex algorithmn computations and presents them to you instead in two related pairs of input parameters : (1) SSF parameters that impact the scale of SL/TP; (2) SL/TP Profit Trigger parameters that impact the timing at which trailing of SL/TP is initiated;
(1)Pair 1 - SSF parameters that impact the scale of SL/TP:
- (1a) SSF_SPOC_RATIOADJUSTER =false to use SYMBOL_SSF:
The default value here is 'true' meaning that the SPOC SL/TP SSF Portfolio Adjuster value settings that were input in the 'platform-generic' section are ACTIVE by default; if you wish instead to be very specific and precise about the SSF value for this specific symbol, and hence the SL/TP that will be applied, then you should select 'false' here. selecting 'false' overrides the 'platform-generic' SPOC_SSF value and instead applies the 'symbol-specific' parameter values that you will enter below:
- (1b) incr =widen SL/TP : scale 1-100 (def=50):
The default setting here is '50' - the value of '50' has no specific merit, but is simply provided as a reference tool against which you can optimise the setting to impact the SL/TP value : '50' is actually a 'masked' value that sits in front of a hugely diversified metric that is associated with each Symbol and is representative of a meaningful 'starting point' for SL/TP consideration for that symbol; you can think of this as a simple factor that is uniformly devised as a kind of 'midpoint' SL/TP value for that specific symbol, but you can easily ratio the SL/TP UP/DOWN in a range 1-100. Each Trader has different experiences and risk considerations and as such, you should consider the SL/TP value here in your own context and adapt the value to suit your own needs - always consider this in light of the reality of your own Account size; the lotsizing being placed for the Symbol in question; the Stop-Loss in place; the overall %Risk that the order contributes to your portfolio.
- if, over time, you find the '50' value to be placing SL/TP levels that exceed your expectation or preference, you can try proportionally reducing this value to better suit your preference; similarly, the reverse approach can be used to increase SL/TP levels.
(2)Pair 2 - SL/TP Profit Trigger parameters that impact the timing at which trailing of SL/TP is initiated:
- (2a) SYMBOL vs SPOC_SLTP_TRIGGER =true to activate:
The default value here is 'false' meaning that the SPOC SL/TP Trigger value settings that were input in the 'platform-generic' section are ACTIVE by default; if you wish instead to be very specific and precise about the SLTP Trigger value for this specific symbol, and hence the Profit level at which SL/TP dynamic activation (SLTP trailing) will be applied, then you should select 'true' here - Selecting 'true' overrides the 'platform-generic' SPOC SL/TP Trigger value and instead applies the 'symbol-specific' parameter values that you will enter below:
- (2b) incr to 'trigger' early v profit(SYMvsSPOC active):
We have set a default value here of 5.0 - the value of '5.0' has no specific merit, but is simply provided as a reference tool against which you can optimise the setting to impact the SL/TP Trigger value : '5.0' is actually a 'masked' value that sits in front of a hugely diversified metric that is associated with each Symbol and is representative of a Profit/Loss value that will trigger the SL/TP into a dynamic action which may be to either trail the stoploss, or in some situations to adapt the TP as a risk mitigation tool to potentially reduce losses in a losing trade situation - if, over time, you find the '5.0' value to be a bit 'loose' on triggering this SL/TP action, you may simply increase the number - so, for example if you were to increase the value of '5.0' by 50% to '7.5', then this would proportionally reduce the Profit/Loss level at which the SL/TP dynamics come into play; similarly, a reduction of the value of '5.0' to a lower number, would have a reverse effect (in proportion).
Always remember that SL/TP settings will also impact %Risk exposure, as detailed elsewhere in this User-Manual.
- if this all sounds a little bit too complex, it is because IT IS complex! But all that you really need to know is that the default value of '5.0' will work for you in most situations, but if you want you can make the SL/TP even more dynamic by slightly increasing the value, or you can 'soften' the SL/TP action by reducing the value somewhat. Also, it is useful to know that this is also not the only way that AlgoEdge Trading system handles stop loss and take profit levels - we also have some other overlying techniques that monitor and track very unique SL/TP approaches to be explained elsewhere in this User-Manual.
Simply input the SL/TP 'Trigger' and 'SSF" values that you feel to be most appropriate to suit your trading style and expectations.
- feel free to 'revisit' and further optimise these input levels as you gain experience with how the AlgoEdge Trading system behaves over time...
The choice is always yours - change the 'symbol-specific' SL/TP settings to suit you!
The sixth Important 'symbol-unique' Parameter that you must make a decision on, is actually a group of 3 parameters that relate to Trade Hour settings and looks like this :
 You will find this parameter grouping is repeated for each symbol throughout the properties table list and is amongst the last listing/s as each Symbol grouping starts - simply look for the [I] Prefix under each section that shows all the relevant parameters for that symbol and then the associated text:
Start GMT period for declining SL/TP trades (24Hrs)
End GMT period for declining SL/TP trades (24Hrs)
Activate limit on SL/TP GMT Trade Hr closures
(take note of the icon colour - it can help you find the parameter quicker)
- You need to only update the sectional parameter that refers to the specific Symbol upon which Chart you are installing the EA; i.e. You need to update this parameter with your preference only ONCE per Symbol, and then save your preferred/optimised setting to the respective 'Master Entry' preset file that is named for that Symbol.
This is an Important selection because your selection provides the AlgoEdge system with guidance on how you would like to SL/TP activations during certain periods of the day - most notably, 'end of day Rollover' periods can be extremely volatile, and some Brokers will extend spreads to somewhat ridiculously wide levels during these periods - you may not wish to respect SL/TP events during these periods as doing so can undermine your portfolio-building intentions.
Let's more fully explain each of these parameters and how you may optimise them to best suit your own unique trading style and preferences:
Start GMT period for declining SL/TP trades (24Hrs):
The default setting here is 'unique' to each Symbol - this is a rather 'self-explanatory' parameter in that the value that you enter here implies a starting time window in GMT 24 Hr timing, during which period SL/TP triggers will be ignored and trade closures for that specific symbol will therefore not be activated, until the defined period expires.
Always input a value as an integer on the 24 hour daily clock; for example 23 = 11pm GMT.
End GMT period for declining SL/TP trades (24Hrs):
The default setting here is 'unique' to each Symbol - this is a rather 'self-explanatory' parameter in that the value that you enter here implies an ending time window in GMT 24 Hr timing, during which period SL/TP triggers will be ignored and trade closures for that specific symbol will therefore not be activated, until the defined period expires.
Always input a value as an integer on the 24 hour daily clock; for example 20 = 8pm GMT.
Activate limit on SL/TP GMT Trade Hr closures
The default setting here is 'true'. This is a fairly self-explanatory parameter in that a selection of 'true' here implies that the above two GMT timings that relate to a Trade Hour time window are then Activated, meaning that SL/TP triggered trade events will be ignored during the defined GMT trading window period. Trading will continue a normal prior to and once the defined GMT trade hour window expires.
- if you prefer to not restrict SL/TP triggers during the time window, change the parameter setting to 'false'.
Simply verify these guidance parameter settings for restrictions on GMT Trade Hours as they apply to the specific Symbol upon which chart you have loaded the EA and then update the saved 'Master Entry' preset file for that Symbol.
You will find this parameter grouping is repeated for each symbol throughout the properties table list and is amongst the last listing/s as each Symbol grouping starts - simply look for the [I] Prefix under each section that shows all the relevant parameters for that symbol and then the associated text:
Start GMT period for declining SL/TP trades (24Hrs)
End GMT period for declining SL/TP trades (24Hrs)
Activate limit on SL/TP GMT Trade Hr closures
(take note of the icon colour - it can help you find the parameter quicker)
- You need to only update the sectional parameter that refers to the specific Symbol upon which Chart you are installing the EA; i.e. You need to update this parameter with your preference only ONCE per Symbol, and then save your preferred/optimised setting to the respective 'Master Entry' preset file that is named for that Symbol.
This is an Important selection because your selection provides the AlgoEdge system with guidance on how you would like to SL/TP activations during certain periods of the day - most notably, 'end of day Rollover' periods can be extremely volatile, and some Brokers will extend spreads to somewhat ridiculously wide levels during these periods - you may not wish to respect SL/TP events during these periods as doing so can undermine your portfolio-building intentions.
Let's more fully explain each of these parameters and how you may optimise them to best suit your own unique trading style and preferences:
Start GMT period for declining SL/TP trades (24Hrs):
The default setting here is 'unique' to each Symbol - this is a rather 'self-explanatory' parameter in that the value that you enter here implies a starting time window in GMT 24 Hr timing, during which period SL/TP triggers will be ignored and trade closures for that specific symbol will therefore not be activated, until the defined period expires.
Always input a value as an integer on the 24 hour daily clock; for example 23 = 11pm GMT.
End GMT period for declining SL/TP trades (24Hrs):
The default setting here is 'unique' to each Symbol - this is a rather 'self-explanatory' parameter in that the value that you enter here implies an ending time window in GMT 24 Hr timing, during which period SL/TP triggers will be ignored and trade closures for that specific symbol will therefore not be activated, until the defined period expires.
Always input a value as an integer on the 24 hour daily clock; for example 20 = 8pm GMT.
Activate limit on SL/TP GMT Trade Hr closures
The default setting here is 'true'. This is a fairly self-explanatory parameter in that a selection of 'true' here implies that the above two GMT timings that relate to a Trade Hour time window are then Activated, meaning that SL/TP triggered trade events will be ignored during the defined GMT trading window period. Trading will continue a normal prior to and once the defined GMT trade hour window expires.
- if you prefer to not restrict SL/TP triggers during the time window, change the parameter setting to 'false'.
Simply verify these guidance parameter settings for restrictions on GMT Trade Hours as they apply to the specific Symbol upon which chart you have loaded the EA and then update the saved 'Master Entry' preset file for that Symbol. **HIT the + Button (above right) to view more (hidden) parameters**